Troubleshooting webcam problems on your PC
Troubleshooting Step 1: Make Sure Everything Correctly Setup
- Restart your computer: Restarting your device can sometimes solve the issue as it refreshes the system and clears any bugs or errors.
- Check hardware connections: Ensure your webcam is properly connected to your device, and all cables are firmly plugged in.
- Check for malware: Run a full system scan with your antivirus software to check for any malware or viruses that could be causing issues with your webcam.
- Adjust webcam settings: Check your webcam settings and make sure the correct device is selected. Also, ensure the privacy settings on your device are set up correctly, allowing apps to access your camera.
- Check for physical obstructions: Ensure there are no physical obstructions such as a closed laptop lid, a dusty lens, or any other objects blocking the camera’s view.
Troubleshooting Step 2: Install Webcam Driver
Step 1: Check device drivers:
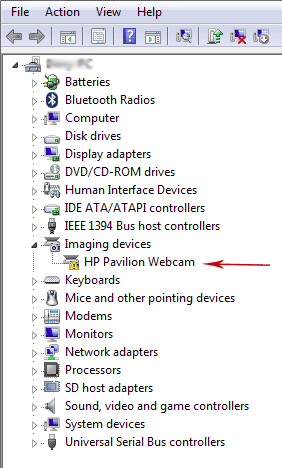
Make sure that the necessary drivers are installed for your webcam to work. To check this, go to your device manager and look for any yellow exclamation marks next to your webcam driver. If you find any, update or reinstall the driver.

Step 2: Download the correct driver for your webcam:
Visit the website of your webcam manufacturer’s support site to check if they have provided drivers to make the model of your webcam compatible with your operating system. You can also use a tool like DriverFinder to easily scan and download the missing webcam device drivers.
Step 3: Install the webcam driver:
Once you have downloaded the driver, double-click on the setup file to start the installation procedure. Follow the prompts to complete the installation.
Step 4: Restart your computer:
After installing the webcam driver, restart your computer. This will allow the driver to be properly configured.
Step 5: Test your webcam:
Open our webcam testing to test your webcam. If your webcam is functioning properly, you should be able to see yourself in the preview window.
The reason why your webcam is not working in the above scenario is that there are either no drivers (or incompatible drivers) installed.
Tip: To open Device Manager in Windows, click Start, type Device Manager in the Start Search box and press Enter.
Troubleshooting Step 3: Use Troubleshooting Wizard to Identify the Problem and Fix it
If your webcam is listed in Device Manager but does not work even after updating the drivers, you can use the Hardware and Device Troubleshooter provided in Windows to identify and fix the problem. Follow the steps below to start the Hardware and Device Troubleshooter in Windows:
- Click on the Start button
- Click on ControlPanel
- Under the System and Security category, click Find and fix problems
- Next, under Hardware and Sound, click Configure a Device
- Your system may prompt you to enter the Administrator password. Enter the Administrator password
- Follow the instructions given in the troubleshooting wizard to identify and fix the issue.
The Hardware and Device Troubleshooter will scan your computer for any hardware-related issues and will attempt to fix them. This can be helpful in identifying and resolving any problems with your webcam that are not related to driver issues.
If the troubleshooter is unable to resolve the issue, it may provide you with some additional information about the problem. This can help you to better understand the problem and potentially find a solution.
Overall, using the Hardware and Device Troubleshooter can be a helpful tool in identifying and resolving issues with your webcam. If you’re still having trouble after using this tool, you may want to try some of the other troubleshooting steps, such as installing the webcam driver in compatibility mode or contacting customer support
Troubleshooting Step 4: Install Windows 7 Driver in Compatibility Mode
If your webcam manufacturer does not provide drivers for Windows 10 or Windows 11 for your make and model of webcam, you can try installing the Windows 7 Driver in compatibility mode. You will get an error which says that the program is not compatible with your version of Windows when you click on the setup file. In such a situation, you need to follow the steps below to install the webcam in compatibility mode:
- Download the Windows 7 driver for your webcam from the manufacturer’s website.
- Right-click on the downloaded driver file and select Properties.
- In the Properties window, click on the Compatibility tab.
- Check the box that says “Run this program in compatibility mode for” and select Windows 7 from the drop-down menu.
- Also, check the box that says “Run this program as an administrator“.
- Click on Apply and then click on OK.
- Double-click on the driver file to start the installation process.
- Follow the on-screen instructions to complete the installation.
After installing the Windows 7 driver in compatibility mode, check if your webcam is working properly. If it is not, you may want to try to contact customer support for further assistance.
installing the Windows 7 driver in compatibility mode can be a useful solution if your webcam manufacturer does not provide a driver for your webcam that is compatible with Windows 10. However, it may not always be successful, so you should consider Troubleshooting Step 1 options if this step does not resolve your issue.
Troubleshooting Step 5: Reinstall Windows
If all else fails, you may need to reinstall Windows. Before doing this, make sure that you have backed up all your important data.
If you’ve tried all of the above steps and your webcam still isn’t working, it’s possible that there’s a hardware issue. Contact technical support for further assistance.
 Online Hardware Test Online Hardware Test – Tips and Troubleshooting